If you’re a business owner, you may be wondering if selling your products on Amazon is a good idea. The answer is yes – Amazon Store is a great way to reach more customers and sell more products.
In this blog post, we will discuss the basics of opening an Amazon Store for your business. We’ll cover everything from creating an account to setting up your storefront. By the end of this post, you’ll know everything you need to get started!
What is Amazon Store?
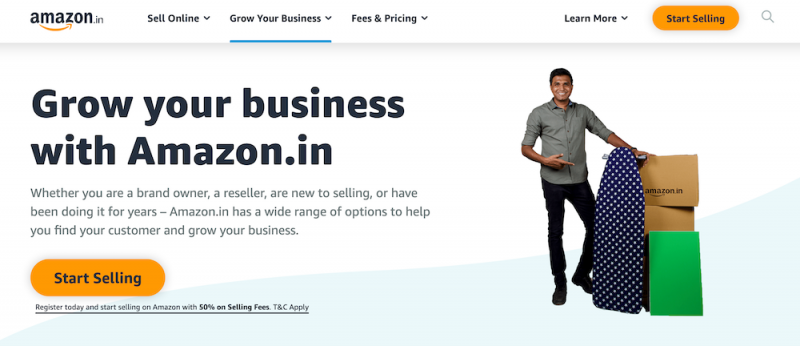
An Amazon Store is an online store that allows businesses to sell their products on the Amazon marketplace. This gives businesses access to millions of potential customers who are already shopping on Amazon.
By having a presence on Amazon, businesses can increase their visibility and reach a larger audience. Amazon Store also offers businesses the ability to offer Prime shipping, which provides customers with free two-day shipping on eligible items.
Why become a seller on Amazon?
Selling on Amazon has many benefits, including:
Also Read: Benefits of Choosing The Right Digital Marketing Company
Reach millions of potential customers
Amazon is one of the most popular eCommerce platforms in the world, with millions of users worldwide.
By becoming an Amazon seller, you can reach a huge potential customer base and sell your products to a global audience.
Setting up an Amazon store is quick and easy, and there are a number of different selling plans to choose from depending on your needs.
Amazon also offers a wide range of marketing and promotional tools to help you reach more customers and boost your sales.
So if you’re looking to take your business to the next level, becoming an Amazon seller is a great option to consider.
Offer Prime shipping
Amazon is the biggest online marketplace in the world, and millions of people use it every day to buy and sell products.
If you’re a seller on Amazon, one of the best ways to increase your sales is to offer Amazon Prime shipping.
Amazon Prime is a premium shipping service that offers customers free two-day shipping on eligible items.
In addition, Amazon Prime members also get access to exclusive deals and discounts.
By offering Amazon Prime shipping on your items, you can significantly increase your sales and reach a larger audience.
Since Amazon takes care of the shipping and handling, you don’t have to worry about any additional costs or hassle. So if you’re looking to boost your sales on Amazon, offering Amazon Prime shipping is a great way to do it.
Increase visibility and reach a larger audience
If you’re selling products on Amazon, it’s important to make sure that your listings are visible and attractive to potential buyers.
There are a few key ways to increase your visibility and reach a larger audience on Amazon. First, make sure that your Amazon store is optimized for search engines.
This means using relevant keywords in your titles and descriptions and providing high-quality product images.
Secondly, take advantage of Amazon’s advertising options. Sponsored product ads can help to increase the visibility of your listings, and you can target potential customers based on their shopping habits and interests.
Finally, consider partnering with influencers or other businesses in your niche. This can help to increase exposure for your products and build trust with potential buyers. By taking these steps, you can significantly increase your chances of success on Amazon.
Boost sales
Amazon is the world’s largest online marketplace, making it an ideal platform for businesses of all sizes to reach a global audience.
If you’re looking to boost sales on Amazon, there are a few key strategies you can use. One is to make sure your Amazon store is well-organized and easy to navigate.
Customers should be able to find what they’re looking for quickly and without difficulty. Another important strategy is to offer competitive prices.
Amazon shoppers are known for their willingness to compare prices before making a purchase, so it’s important to stay competitive.
Finally, consider using Amazon’s advertising tools to reach a wider audience. By using Amazon’s pay-per-click ads, you can target potential customers who are specifically searching for products like yours.
Opening an Amazon Store is a great way to reach more customers and boost sales. If you’re ready to get started, follow the steps below!
How to Become an Amazon seller
Amazon is the largest online marketplace in the world, with over two billion products available for purchase.
For many businesses, becoming an Amazon seller is a great way to reach a large audience of potential customers.
However, there are a few things to keep in mind before setting up an Amazon store.
First, sellers will need to create a professional account and complete Amazon’s registration process.
Next, they will need to choose a product or products to sell and create listings for them on Amazon. Finally, they will need to set up payment methods and shipping options.
By taking these steps, businesses can get started selling on Amazon and reach a wide audience of potential customers. Here is a detailed step-by-step guide to becoming an Amazon seller.
STEP 1: Registration
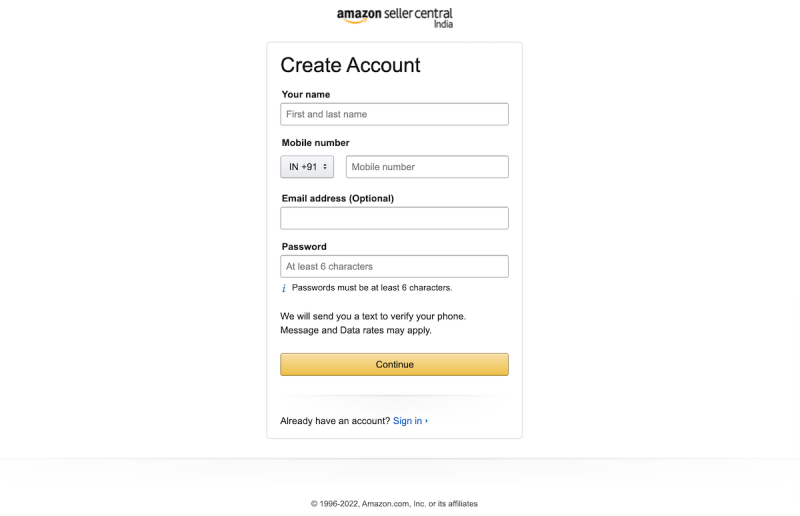
The first step is to create an Amazon account. You can do this by going to Amazon.com and clicking on “Create Your Amazon Account.”
Enter your information and follow the instructions to finish creating your account. Once you have an Amazon account, you can sign in and access your Amazon Store.
Now that you have an Amazon account, you need to register as a seller. To do this, go to Amazon Seller Central and click on the “Register Now” button.
Enter your information and follow the instructions to finish registration as a seller. Once you’re registered, you can begin setting up your Amazon Store.
STEP 2: Setting Up Your Profile
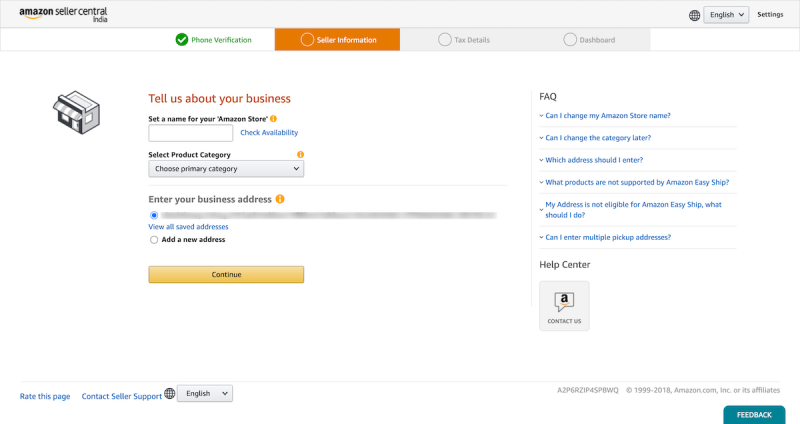
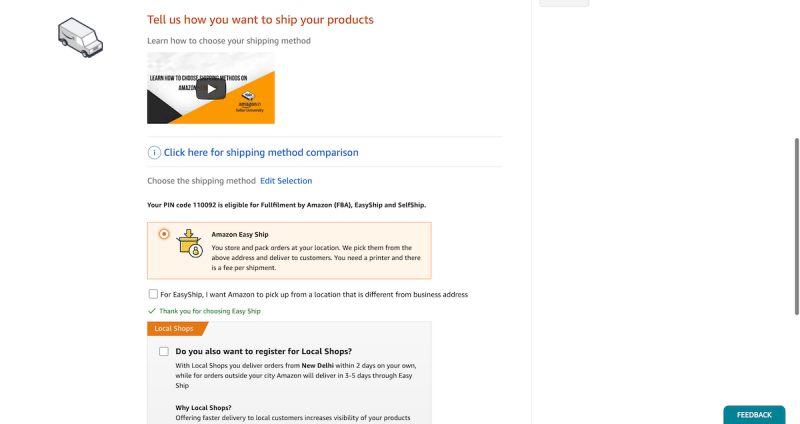
The next step is to set up your profile. This is where you’ll add your business information, such as your company name, product category, business address etc.
Brand display name: Your storefront will show your brand’s display name, so choose a name that customers will recognize.
For example, if your company is called “1Solutions Inc.,” you could use “1Solutions” as your brand’s name.
Shipping details- You can opt for Amazon Easy Shop in which the Amazon teal will pick the items from your location once you pack them. There is a predefined fee for the shipping.
There are other shipping options also available but we suggest you to stick with this option initially.
For standard-sized items that weigh less than 500 gms, Easy Ship charges INR 40 for local shipping, INR 51 for regional shipping, and INR 72 for national shipping.
Also Read: Most Effective SEO Strategies to #1 Rank
STEP 3: Tax Details
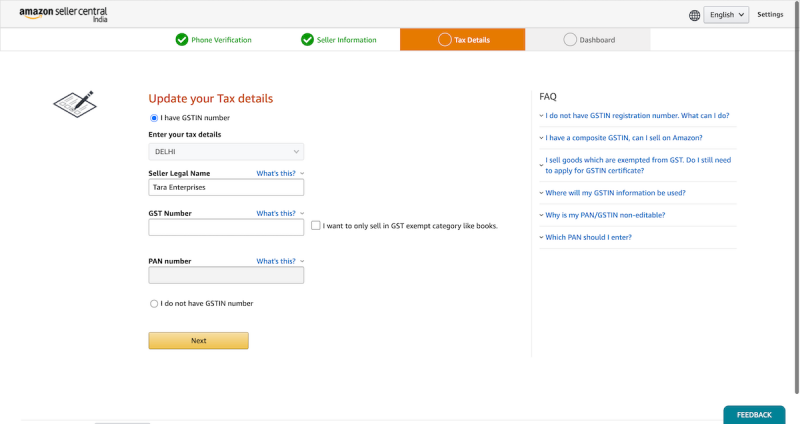
The next step is to add your tax information. Amazon will use this information to calculate and collect taxes on your behalf.
To add your tax information, go to the “Settings” tab and click on the “Tax Settings” link.
Option 1: Have a GST number- Update your Provisional GSTIN and PAN number, then click the ‘Next’ button.
Option 2: Sell in the GST-Exempt Category- Enter your PAN number and press the ‘Next’ button.
Option 3: I don’t have GST and will update later; click the ‘Next’ button.
Option 4: Never registered for GST- If you have never registered for GST, please learn how to do so. Importantly, no GST number is required to sell books on Amazon.
Once you put in your tax information, a one-time password (OTP) will be sent to the registered mobile number and email of the GSTIN holder. You need to authenticate it to move forward.
STEP 4: Default Product Tax Details
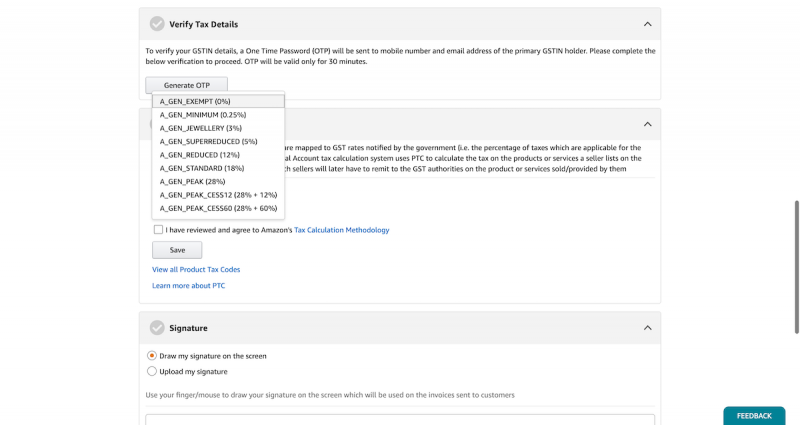
The next step is to add your default product tax code information.
Product Tax Codes, or PTCs, are numbers that correspond to the GST rates that the government announces (i.e. the percentage of taxes which are applicable for the sale of products or services).
The PTC is used by the Seller Central Account tax calculation system to figure out how much tax a seller has to pay on the goods or services they list on the marketplace.
This is the amount of tax that sellers will need to pay to the GST authorities for the goods or services they sell or provide.
STEP 5: Banking Details
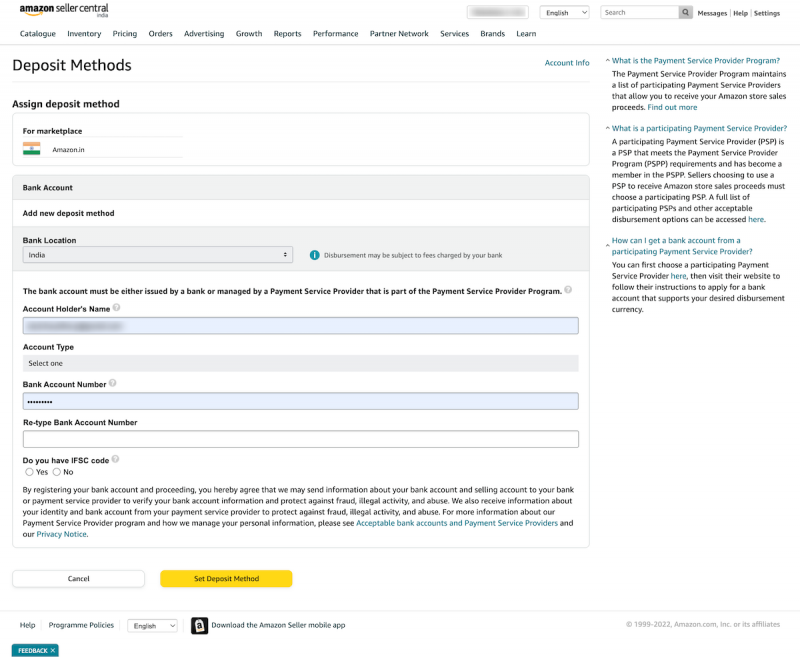
The next step is to add your banking details and listing preferences. This is where you’ll enter your bank account information so Amazon can pay you for your sales.
To add your banking details, go to the “Settings” tab and click on the “Banking Details” link.
Enter your bank information to receive payments and upload a scanned image of your signature for use on customer invoices.
Launch your business by listing the products you desire to sell on Amazon.
Also Read: How to Get Started With Shopify?
How to List your products on Amazon
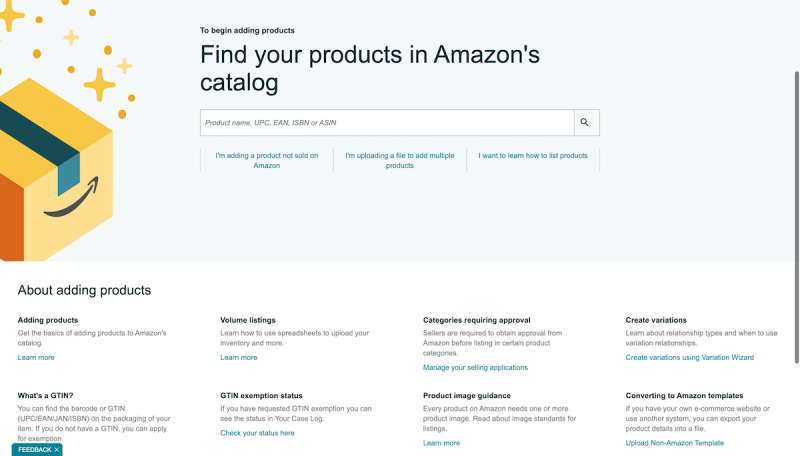
Now it’s time to add your products!
To begin adding products Find your products in Amazon’s catalog.
Enter the product information and follow the instructions to finish adding your product. Once you’ve added all of your products, you can move on to the next step.
Enter your product information and follow the instructions to add your product. Once you’ve added all of your products, you can move on to the next step.
Add one product at a time
Add a Product is a web-based interactive interface for listing a small number of products one at a time. In Seller Central, the Add a Product feature is accessible via the Inventory drop-down menu. The tool can be used to:
Match an existing product listing: If you wish to sell a product that already exists on Amazon, you must match the existing product detail page.
Make a new product listing as follows: If the product you want to sell does not already exist on Amazon, you can list it and Amazon will build a new product description page.
Also Read: Role of Link Building in SEO
Create bulk listing
A. Inventory file templates
An Inventory File Template is a Microsoft Excel spreadsheet with many data columns for describing your products. Sellers use Inventory File Templates to upload listings to Amazon. Different inventory file templates assist sellers in creating new product listings, updating existing product data, and adding their offering to an existing product.
Most inventory file templates are tailored to a single product category. If you are unsure about which category your products will fit into, utilize the search tool or product classifier offered here to build a file for your product. Creating your personalized inventory file provides thorough instructions on how to create an inventory file.
B. Add your products in bulk using inventory files
If you wish to enter multiple product listings at once, you can use inventory file templates. These are tab-delimited text files (.txt) that contain all of the information needed to sell your products on Amazon.
Step 1
- Make a bulk listing
- Click the Inventory tab in Seller Central.
- To begin bulk listing, select Add a Product through Upload or Add a Product, and then click I am uploading a file to add numerous goods in the search box.
- Choose the Download an Inventory File option.
Step 2
- Add bulk offers to existing products or create new listings
It’s possible that the product you want to list and sell is already available on Amazon. In this situation, you can simply match your products to the Amazon catalog’s current product pages. You can also search the catalog by product title, barcode, or other identifiers to see if your products have previously been listed or sold by other Amazon.in sellers.
If you wish to bulk add offers to current products or create new listings, please click I am downloading a file to start bulk listing.
Create an attribute-rich bulk Excel file.
Prepare Your Listing (PYRL) enables you to submit catalog data in any format with product attributes, but not necessarily in the same format as the inventory file templates available in Seller Central. You can prepare your Excel file in the following ways, depending on your understanding of your products:
Option 1:
If your products are already listed on Amazon, watch this video to learn how to bulk add offers to existing product pages.
- Step 1 must be completed.
- Get the Listing Loader template.
- Use the EAN/UPC/Barcodes of the Amazon items.
- Include information about the offer, such as the price, quantity, and SKU.
- Upload the file under the Upload Inventory File section.
Option 2:
If your products are not currently featured on Amazon.
- Step 1 must be completed.
- Choose the product kinds you want to list.
- To create a template for the selected product kinds, select Advanced mode.
- Add other attribute groups, such as Image and Variation, by clicking Generate Template.
- Ascertain that you have included all of the relevant properties for the product that you plan to list in the inventory or product catalog file. For reference, download a sample product file.
Step 3
Examine the processing report for errors.
Please check the Monitor Upload Status for issues and warnings. If errors occur, obtain the processing report to solve the problem and re-upload. Please see Feed Processing Reports for further information.
Once you’ve completed all of the steps above, your Amazon Store is ready to launch! To do this, go to the “Settings” tab and click on the “Launch Store” button.
Enter your information and click on the “Launch Store” button. You’re now ready to start selling on Amazon!
Things to Keep In Mind
There are a few things to keep in mind as you get started:
First, Amazon has a few rules and guidelines that you’ll need to follow. Be sure to read through these before you start selling.
Second, it’s important to remember that your Amazon Store is a reflection of your brand. As such, you’ll want to make sure that the products you sell and the way you present them are in line with the image you want to project.
Finally, keep in mind that launching an Amazon Store is just the first step in a journey that will hopefully lead to success.
As with any business venture, there’s no guarantee of success, but if you work hard and smart, you increase your chances of making it big!
We hope this guide has been helpful. Good luck!


